
If you’re wondering how to set up your coordinates and what it’s all about, then you’ve come to the right page. We’ll be breaking down the revit coordinate system, what it is, what its used for and much more, so read on.

So what exactly is Revit coordinate system?
Every time you open a new file or link another file to your Revit project, there’s a certain reference point taken into consideration, these are your Revit coordinates. Some can be altered and some are fixed within Revit and cannot be changed.
Types
There are mainly 3 types of Revit Coordinates:
a. Project Base Point
b. Survey Point
c. Invisible Point
And a bonus hidden coordinate called the IFC origin point. (more on this later)
Project Base Point

It is used internally in relation to the building. It is also used to set the angle difference between the True North and the Project North. Most project base points are set at the edge of a building or at the entrance.
Survey Point

It is the real point from surveyor which moves a project to the correct real global location. It is used to create a shared coordination system between multiple Revit or IFC files.
Internal Origin

This point is invisible and always at the zero coordinates (0,0,0) in Revit. By default every import and export will be in relation to this point and it cannot be changed.
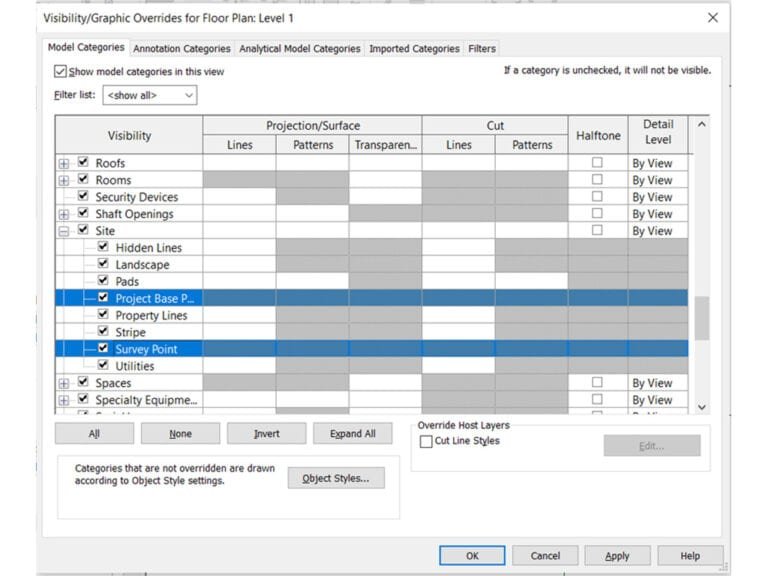
Step By Step Guidelines to Activate These Points In Your File
Step 1
Enter VV (Visibility Graphics) on your keyboard or click on edit next to Visibility/Graphics override.

Step 2
Go to Site and collapse the menu, activate Project Base Point and Survey Point.
How to locate the Internal Origin
It is confusing to track the location of this point since it’s invisible. It’s recommended to mark the point with two intersecting reference planes on your Revit Template, so that it shows up for all new projects.
Step 1
Go to the plan view, select the Project Base Point and click on the clip icon. A red dash appears on the icon. Next, right click on the project base point and select “Move to Startup Location”.

Step 2
The Project Base Point now coincides with the Internal Origin. Mark this Point by creating two intersecting reference planes.
Click on your Architecture tab and select Reference plane in the work plane menu. Create the reference planes at the intersection and name it Internal Origin.

How are Revit Coordinates Used In BIM Projects?
The coordinate system helps for easy coordination between multiple BIM models for clash detection, QAQC checks, and more. It is important to set the correct coordinates for a BIM Project before starting any modeling process.
Conclusion
There you have it, a few simple steps to keep track of your coordinates according to the convenience of the project. We have a lot of BIM content lined up for you, so do sign up for our weekly newsletters for an overview that will help you soar!
Click here to listen to our top episode on Archgyan
The Archgyan Podcast is sponsored by our Courses. Sign Up Now to start your Architecture & Interior Design Journey.
If you’re interested in learning more about architecture firms in Europe, check out this comprehensive list of the top 50 firms compiled by Archgyan. From innovative startups to long-established industry leaders, this list has it all. Take a look and discover some of the most inspiring and influential architecture firms in Europe today.
If you’re interested in architecture and want to learn more about this amazing field, subscribe to our podcast on youtube
For more SketchUp tutorials, head to https://www.sketchupguru.com


